Everything you need to know about solo hiking safety in the UK mountains. From emergency procedures to essential gear, navigation tips to weather awareness – stay safe on your solo mountain adventures.
Solo hiking in the UK mountains is one of the most rewarding experiences you can have. There’s something magical about standing on a summit you’ve climbed entirely under your own steam, making your own decisions, moving at your own pace, and having the landscape entirely to yourself. But hiking alone comes with extra responsibilities—ones that can literally be the difference between a brilliant day out and a call to mountain rescue.
I’ve been hiking solo in the hills and mountains across the UK for years, and while I absolutely love the freedom and self-reliance it brings, I’ve also learned (sometimes the hard way) that preparation and common sense are your best companions on the hills. This guide covers everything you need to know to stay safe while hiking alone in UK mountains, from planning and gear to emergency procedures and psychological preparedness.
Let’s get you out there safely.
Why Hike Solo? The Benefits and the Responsibilities
Before we dive into safety, let’s talk about why people choose to hike alone. Understanding the appeal helps clarify why it’s worth doing properly.
The Benefits of Solo Hiking
Solo hiking offers unique rewards that you simply can’t get from group walks. You move at exactly your own pace—no waiting for slower walkers or being rushed by faster ones. You make all the decisions about routes, breaks, and timings. You’re completely present in the landscape without conversation to distract you. And there’s a deep sense of self-reliance and confidence that comes from navigating mountains independently.
For many of us, solo hiking is meditative. It’s your time to think, to process, to simply be. The mental health benefits are significant—research consistently shows that time in nature, particularly when coupled with physical activity, reduces stress, anxiety, and depression.
The Extra Responsibility
But here’s the thing: when you’re alone, you are your own backup plan. If something goes wrong, there’s no one to go for help, share kit, or make decisions with you. This means you need to be more prepared, more cautious, and more aware than when hiking with others.
This isn’t meant to scare you off—solo hiking is perfectly safe when done properly. It’s just about recognising that the safety margin is smaller, so your preparation needs to be better.
Planning Your Solo Hike: The Foundation of Safety
Good solo hiking starts long before you reach the hills. Proper planning is your first and most important safety measure.
Choose Routes Within Your Ability
This is absolutely critical. Save the challenging routes, technical scrambles, and long mountain marathons for when you’re with others or have built up serious solo experience. For your first solo hikes, choose routes that are:
- Well within your fitness level (aim for about 70-80% of what you could manage in a group)
- On well-marked paths where possible, especially if you’re new to solo hiking
- In reasonably populated areas rather than remote wilderness (at least initially)
- Shorter than you think you need to build confidence gradually
There’s absolutely no shame in starting with easier fells. Catbells, Loughrigg, Latrigg—these are brilliant solo hikes that let you build confidence without excessive risk. The mountains will still be there when you’re ready for bigger challenges.
Research Your Route Thoroughly
You need to know your route intimately before you set off. This means:
- Study the route on a map and understand key features, decision points, and bail-out options
- Check recent trip reports online to understand current conditions
- Identify escape routes at various points along the walk in case you need to cut it short
- Note landmarks that will help you confirm you’re on the right path
- Calculate realistic timings using Naismith’s Rule (check out my Naismith Calculator)
Check the Weather (Properly)
Don’t just glance at a general weather app. UK mountain weather requires specialist forecasting:
Essential weather resources:
- Mountain Weather Information Service (MWIS) – Provides detailed mountain-specific forecasts
- Met Office Mountain Weather – Altitude-specific forecasts
- Lake District Weatherline – Local conditions and fell-top assessments
- Wind speed forecasts – Particularly important for exposed ridges
Check the forecast for the entire day, not just the morning. Mountain weather can change dramatically in hours. Pay particular attention to:
- Wind speed (above 40mph is challenging; above 60mph is dangerous)
- Visibility (low cloud/mist makes navigation much harder)
- Temperature (including wind chill at altitude)
- Precipitation (rain makes rocks slippery; snow/ice adds significant difficulty)
If the forecast looks dodgy, postpone. The fell will still be there tomorrow.
Leave a Route Card
This is non-negotiable for solo hiking. Someone reliable needs to know:
- Exactly where you’re going (with map route if possible)
- Your planned start time and estimated return time
- What to do if you don’t check in (call mountain rescue after a reasonable delay)
- Description of what you’re wearing (helps rescue teams identify you)
- Your mobile number (even if signal is patchy)
Always remember to check in when you get back to your car. This isn’t optional—if you don’t check in and someone calls mountain rescue, you’ve just wasted valuable resources.
You can use apps like Google Maps / Find My iPhone to share your real-time location with trusted contacts, though remember this requires signal and battery.
Essential Safety Gear for Solo Hiking
When you’re alone, your kit needs to be comprehensive. You can’t borrow from a friend if you’ve forgotten something or if conditions change unexpectedly.
The Non-Negotiables
These items should be in your pack on every solo mountain hike, regardless of conditions:
Navigation:
- OS map (1:25,000) of the area – waterproof or in a map case
- Compass (and know how to use it properly)
- GPS device or smartphone with offline maps (OS Maps app is excellent)
- Spare batteries or power bank for electronics
Emergency Equipment:
- Fully charged mobile phone (even if signal is patchy)
- Emergency whistle (the distress signal is six blasts)
- Head torch with spare batteries (even on day walks)
- First aid kit tailored for mountain injuries
- Emergency bivvy bag or space blanket
- Survival bag (large orange bag for visibility and warmth)
Clothing and Protection:
- Waterproof jacket and trousers (not “water resistant” – proper waterproofs)
- Warm layers (fleece and insulated jacket, even in summer)
- Hat and gloves (hypothermia can happen any month in UK mountains)
- Spare socks (wet feet lead to blisters and cold)
- Suitable footwear (proper walking boots with ankle support and good grip)
Food and Water:
- More water than you think you need (at least 1.5-2 litres)
- High-energy snacks (nuts, dried fruit, chocolate, energy bars)
- Emergency food (something calorie-dense that won’t go off)
Optional But Recommended
If you hike solo frequently or in remote areas:
- Personal Locator Beacon (PLB) or satellite communicator like Garmin inReach, or modern iPhone
- Walking poles (brilliant for stability and reducing knee strain)
- Emergency shelter (lightweight tarp or bothy bag)
- Water filter or purification tablets (in case you run out and need to use streams)
Navigation Skills: Your Most Important Safety Tool
Getting lost is one of the most common reasons for mountain rescue callouts. When you’re solo, solid navigation skills aren’t optional—they’re essential.
Master the Basics Before Going Solo
Don’t attempt solo hiking in remote regions until you’re confident with:
- Map reading – understanding contour lines, identifying features, relating map to ground
- Compass work – taking and following bearings, triangulation
- Pacing – knowing how far you walk per 100 paces (useful in poor visibility)
- Timing – understanding how long different terrain takes you
Consider taking a mountain navigation course. The BMC (British Mountaineering Council) and various outdoor education centres run excellent courses. It’s money well spent.
Use Multiple Navigation Methods
Never rely on just one method:
- Primary: Paper map and compass (doesn’t need batteries, doesn’t break)
- Secondary: GPS device or smartphone with offline maps
- Tertiary: Following your planned route and recognizing landmarks
I use my phone’s GPS to confirm position, but I know can navigate by map and compass if Technology fails—batteries die, screens crack, GPS signal drops. Your map and compass will always work.
Navigation in Poor Visibility
This is when solo hiking gets serious. If mist comes down or visibility drops:
- Stop and assess before visibility gets too bad
- Take a compass bearing to your next waypoint before you lose sight of landmarks
- Move slowly and carefully checking position frequently
- Don’t guess – if you’re unsure of position, stop and take time to work it out
- Consider turning back if conditions worsen beyond your skill level
There’s absolutely no shame in turning back. The summit will still be there on a clearer day.
Understanding UK Mountain Hazards
UK mountains might not be Himalayan giants, but they present real hazards that have caused fatalities. Understanding these risks helps you manage them.
Weather-Related Hazards
Hypothermia can occur even in summer if you’re wet, cold, and tired. Early signs include shivering, confusion, and loss of coordination. Prevention is key—stay dry, eat regularly, wear appropriate layers.
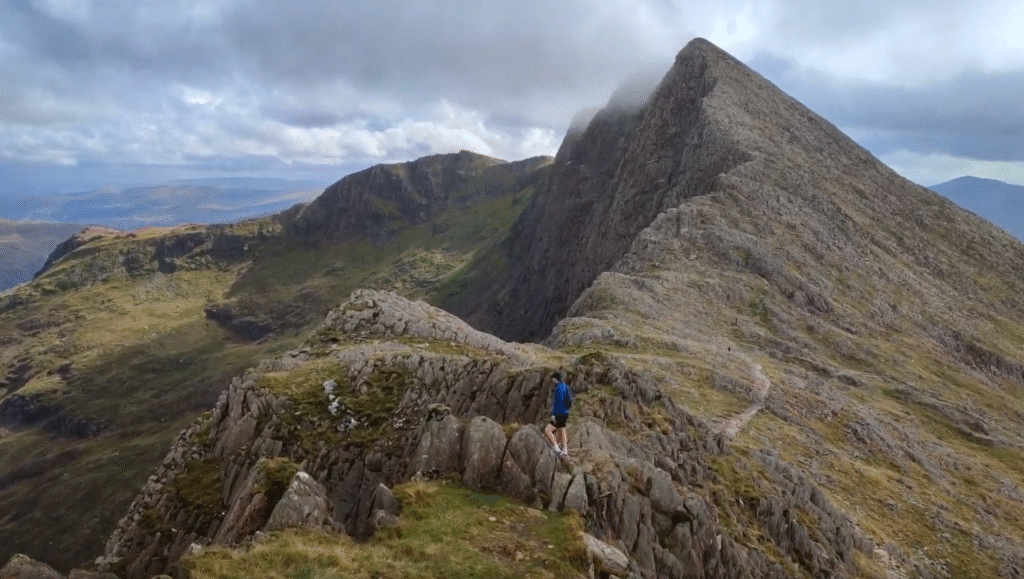
Wind can literally knock you off your feet on exposed ridges. Wind speeds above 60mph make walking dangerous. On edges like Striding Edge, Crib Goch or Sharp Edge, even moderate wind is hazardous.
Lightning is rare but serious. If caught in a thunderstorm, avoid summits, ridges, and isolated trees. Move to lower ground and wait it out.
Terrain Hazards
Slips and trips cause most mountain injuries. Watch your footing constantly, especially on:
- Wet rock (becomes incredibly slippery)
- Loose scree (unstable and tiring)
- Stream crossings (test rocks before committing weight)
- Descents (more accidents happen going down than up)
Steep ground can turn from “challenging” to “dangerous” very quickly. If a path feels too steep or exposed for solo hiking, find an alternative.
Boggy ground is exhausting and can hide holes. Moorland bogs can be deeper than they look. Use trekking poles to test depth before stepping.
Environmental Hazards
Livestock are generally harmless but can be unpredictable, especially:
- Cows with calves (can be aggressive if they feel threatened)
- Bulls (give wide berth to any group with a bull)
- Dogs and livestock (keep dogs under very close control or on lead)
Ticks are increasingly common in UK mountains. Check yourself after walks, particularly around hairline, armpits, and groin. Remove promptly and properly if found. Consider Lyme disease symptoms if you develop a rash or flu-like symptoms after a tick bite.
Solo Hiking Psychology: The Mental Side of Safety
Physical preparation is only half the story. Solo hiking is as much a mental challenge as a physical one.
Know Your Limits and Respect Them
There’s a difference between pushing your boundaries and being reckless. Solo hiking is not the time to attempt routes at the very edge of your ability. Save those challenges for when you have backup.
If something feels wrong, it probably is. Trust your instincts. That little voice saying “this doesn’t feel safe” is worth listening to.
Dealing with Fear and Uncertainty
It’s normal to feel more nervous when hiking alone, especially at first. A certain amount of anxiety is healthy—it keeps you alert and cautious. But excessive fear can impair decision-making.
If you feel anxious:
- Take a break and have a snack (low blood sugar makes anxiety worse)
- Reassess the situation objectively – am I actually in danger or just uncomfortable?
- Remember your preparation – you’ve planned, you have the right gear, you have the skills
- Consider your options – including turning back if necessary
Building Confidence Gradually
Don’t jump straight into big solo mountain days. Build up:
- Start with popular routes where you’ll see other walkers
- Progress to quieter fells as confidence grows
- Gradually increase distance and technicality
- Only attempt really remote routes when you have solid solo experience
I started my solo hiking with short, popular Lake District walks like Catbells and Loughrigg. It took me a couple of years before I tackled multi day trips, bigger, more remote fells alone. There’s no rush.
Staying Motivated and Positive
Solo hiking can be mentally tough when you’re tired, especially on long slogs. Strategies that help:
- Break the walk into sections with mini-goals
- Take regular breaks before you’re exhausted
- Eat and drink frequently to maintain energy
- Remind yourself why you’re out there when it gets tough
- Enjoy the moments of beauty rather than fixating on the destination
Emergency Procedures: What to Do When Things Go Wrong
Hopefully, you’ll never need this section. But knowing emergency procedures is essential for solo hikers.
If You Get Injured
If you can walk:
- Move to a safe, visible location if possible
- Assess the injury and provide first aid
- Consider whether you can safely continue or need to descend
- Call for help if needed (don’t push through serious injury alone)
If you cannot walk:
- Call 999 or 112 immediately if you have signal
- Put on extra layers to stay warm while waiting
- Get into your emergency bivvy if you have one
- Stay where you are so rescuers can find you
- Use your whistle to signal location (six blasts, repeated)
If You Get Lost
Don’t panic. Getting lost doesn’t mean you’re in danger if you handle it calmly:
- Stop moving – wandering while lost makes things worse
- Check your map carefully – can you identify landmarks or features?
- Try to retrace your steps to the last point where you knew your location
- Take a bearing if you can identify a landmark or know which direction to go
- Head for a linear feature (stream, path, wall) if unsure – these lead somewhere
- Call for help only if truly lost and unable to navigate out
If you have to spend an unplanned night out:
- Find the best shelter you can (hollow, wall, rocks)
- Put on all your layers
- Get into your emergency bivvy
- Eat your emergency food
- Stay calm—mountain rescue will find you
Calling Mountain Rescue
In an emergency, call 999 or 112:
- Ask for Police, then ask for Mountain Rescue
- Provide your grid reference (use location app like What 3 Words, if you have signal)
- Describe your location with landmarks
- Explain the nature of the emergency
- Give your mobile number
- State number of people (in your case, just you)
- Describe what you’re wearing (helps rescuers spot you)
Do not move from your location unless in immediate danger. Rescuers need to know where to find you.
If you have no signal:
- Move to higher ground to try to get signal
- If you have an iPhone 14 or later, you can contact emergency services via satellite. (Make sure you know how before you go!)
- Text 999 if you’re registered with emergencySMS (register NOW, before you need it)
- Use your whistle to attract attention (six blasts)
- Stay visible and in a safe location
Remember: Mountain Rescue in the UK is a free service provided by volunteers. Never hesitate to call them if you genuinely need help. However, also never call them unnecessarily—wait out bad weather rather than asking to be rescued just because you’re uncomfortable.
Weather Awareness: Reading the Sky
Understanding mountain weather can keep you out of trouble. The forecast is your planning tool, but once you’re on the hill, you need to be able to read actual conditions.
Signs of Deteriorating Weather
Watch for:
- Clouds moving fast – indicates high winds aloft
- Cloud lowering – mist could descend, reducing visibility
- Sudden temperature drop – front moving in
- Darkening clouds – heavy rain or storms approaching
- Wind picking up significantly – could become unsafe
Making Weather-Based Decisions
If weather deteriorates while you’re out:
Minor deterioration (light rain, some cloud):
- Continue but monitor conditions
- Put on waterproofs before you get wet
- Check you’re still on route
Moderate deterioration (heavy rain, wind increasing, some loss of visibility):
- Consider whether to continue to summit or turn back
- Take more frequent navigation checks
- Eat and drink to maintain energy
- Watch for signs of hypothermia in yourself
Serious deterioration (very high winds, heavy precipitation, poor visibility):
- Prioritize getting off exposed ground safely
- Consider taking a shorter descent route
- Be prepared to move slowly and carefully
- Don’t be afraid to wait out the worst in shelter
Dangerous conditions (lightning, extreme winds, whiteout):
- Descend immediately by safest route
- Get off ridges and summits
- Seek any available shelter
- If trapped, hunker down in best available protection
Solo Hiking Etiquette and Smart Practices
Interacting with Other Walkers
Solo hiking doesn’t mean being antisocial, but it does mean being thoughtful about interactions:
- Be friendly but not over-sharing – a quick greeting is fine; detailed route discussions with strangers less so
- Don’t feel obliged to walk with people you meet – it’s fine to maintain your solo status
- As a solo hiker, use your judgment about sharing detailed plans with strangers you meet on the trail
- If someone seems to make you uncomfortable, trust your instincts and create distance
Staying Safe Around Others
- Let faster walkers pass safely
- Give clear communication if overtaking slower groups
- Be respectful of others’ solitude – not everyone wants to chat
- If you see someone in difficulty, offer help if you can do so safely
Leave No Trace
All hikers have a responsibility to minimize impact:
- Take all litter home (yes, including banana skins and apple cores)
- Follow paths to prevent erosion
- Don’t build new cairns or structures
- Avoid disturbing wildlife
- Close gates behind you
- Stick to right of way on access land
Building Solo Hiking Fitness and Skills
Solo hiking is more demanding than group hiking, so maintaining good fitness and skills is important.
Physical Preparation
- Regular walking to maintain fitness
- Strength training for legs, core, and stability
- Cardiovascular exercise to build stamina
- Practice with loaded pack – walking with 8-10kg is very different from walking light
Skill Development
Continuously improve:
- Navigation skills through courses and practice
- First aid knowledge – take a mountain first aid course
- Weather interpretation – learn to read clouds and conditions
- Route planning – analyze your routes afterward to learn
Mental Preparation
- Visualize challenging situations and how you’d handle them
- Practice decision-making on easier routes
- Build gradually from shorter to longer solo hikes
- Learn from each outing – what went well, what could improve
When NOT to Hike Solo
Solo hiking isn’t always appropriate. Recognize when it’s better to wait for a partner or group:
- When attempting your first time on a new, challenging route
- In winter conditions unless you have serious mountaineering experience
- When forecast is marginal and might deteriorate to dangerous
- If you’re feeling unwell or below par
- On very remote routes where help would be hours away
- When attempting scrambles or technical terrain for the first time
- If you’re mentally not in a good place to make sound decisions
There’s no shame in any of these. Good judgment is knowing when solo hiking is and isn’t appropriate.
Your Solo Hiking Journey Starts Here
Solo hiking in UK mountains is genuinely one of the most rewarding things you can do. The sense of achievement, the deep connection with landscape, the confidence it builds—these are experiences that stay with you for life.
But it must be done properly. Every point in this guide exists because it keeps you safe. Solo hiking is not about taking unnecessary risks—it’s about managing risks intelligently so you can enjoy the mountains safely and sustainably.
Start small. Build gradually. Learn continuously. Respect the mountains and your own limitations. And always, always tell someone where you’re going.
The UK’s mountains are waiting for you. And when you’re standing on that first solo summit you’ve earned entirely through your own skill and determination, you’ll understand why so many of us keep going back.
Stay safe, hike smart, and enjoy every moment of solitude among the fells.
Quick Reference: Solo Hiking Safety Checklist
Before You Go:
- ☐ Check detailed mountain weather forecast
- ☐ Plan route and identify bail-out points
- ☐ Leave route card with emergency contact
- ☐ Charge phone and GPS devices fully
- ☐ Pack all essential safety gear
- ☐ Check your first aid kit is complete
Essential Gear to Carry:
- ☐ OS map (1:25,000) and compass
- ☐ Fully charged phone with offline maps
- ☐ Emergency whistle
- ☐ Head torch with spare batteries
- ☐ Waterproof jacket and trousers
- ☐ Warm layers including hat and gloves
- ☐ Emergency bivvy bag
- ☐ First aid kit
- ☐ Plenty of food and water (more than you think you need)
While Out:
- ☐ Check position regularly against map
- ☐ Monitor weather conditions
- ☐ Eat and drink frequently
- ☐ Turn back if conditions deteriorate
- ☐ Trust your instincts about safety
- ☐ Use your whistle if you need help (6 blasts)
After Your Walk:
- ☐ Check in with your emergency contact
- ☐ Check yourself for ticks
- ☐ Review what went well and what to improve
Emergency Numbers:
- 999 or 112 – Ask for Police, then Mountain Rescue
- Register with emergencySMS before you need it: text ‘register’ to 999
Recommended Resources
Navigation and Skills:
- British Mountaineering Council (BMC) – Skills courses and safety advice
- Ordnance Survey – Maps and OS Maps app
- Mountain navigation courses – Available through outdoor centres UK-wide
Weather Information:
Safety Organizations:
My Resources:
- 51 Wainwright Walks – Route planning with GPX files
- Naismith Calculator – Plan your walking times
- My Route Maps – Interactive walking routes
Leave a Reply